K8s - Pod Update Strategies in Kubernetes: From Default to Canary and Beyond
🚀 Pod Update Strategies in Kubernetes: From Default to Canary and Beyond
Updating Kubernetes pods can feel risky, especially with live environments. But with the right strategy, it can be a breeze. Today, we’ll cover the default Kubernetes update strategy and dive into a Canary Deployment setup, plus a quick look at Blue-Green Deployment as a bonus. Let’s get into it! 🌟
⚙️ Kubernetes’ Default Update Strategy: The Rolling Update
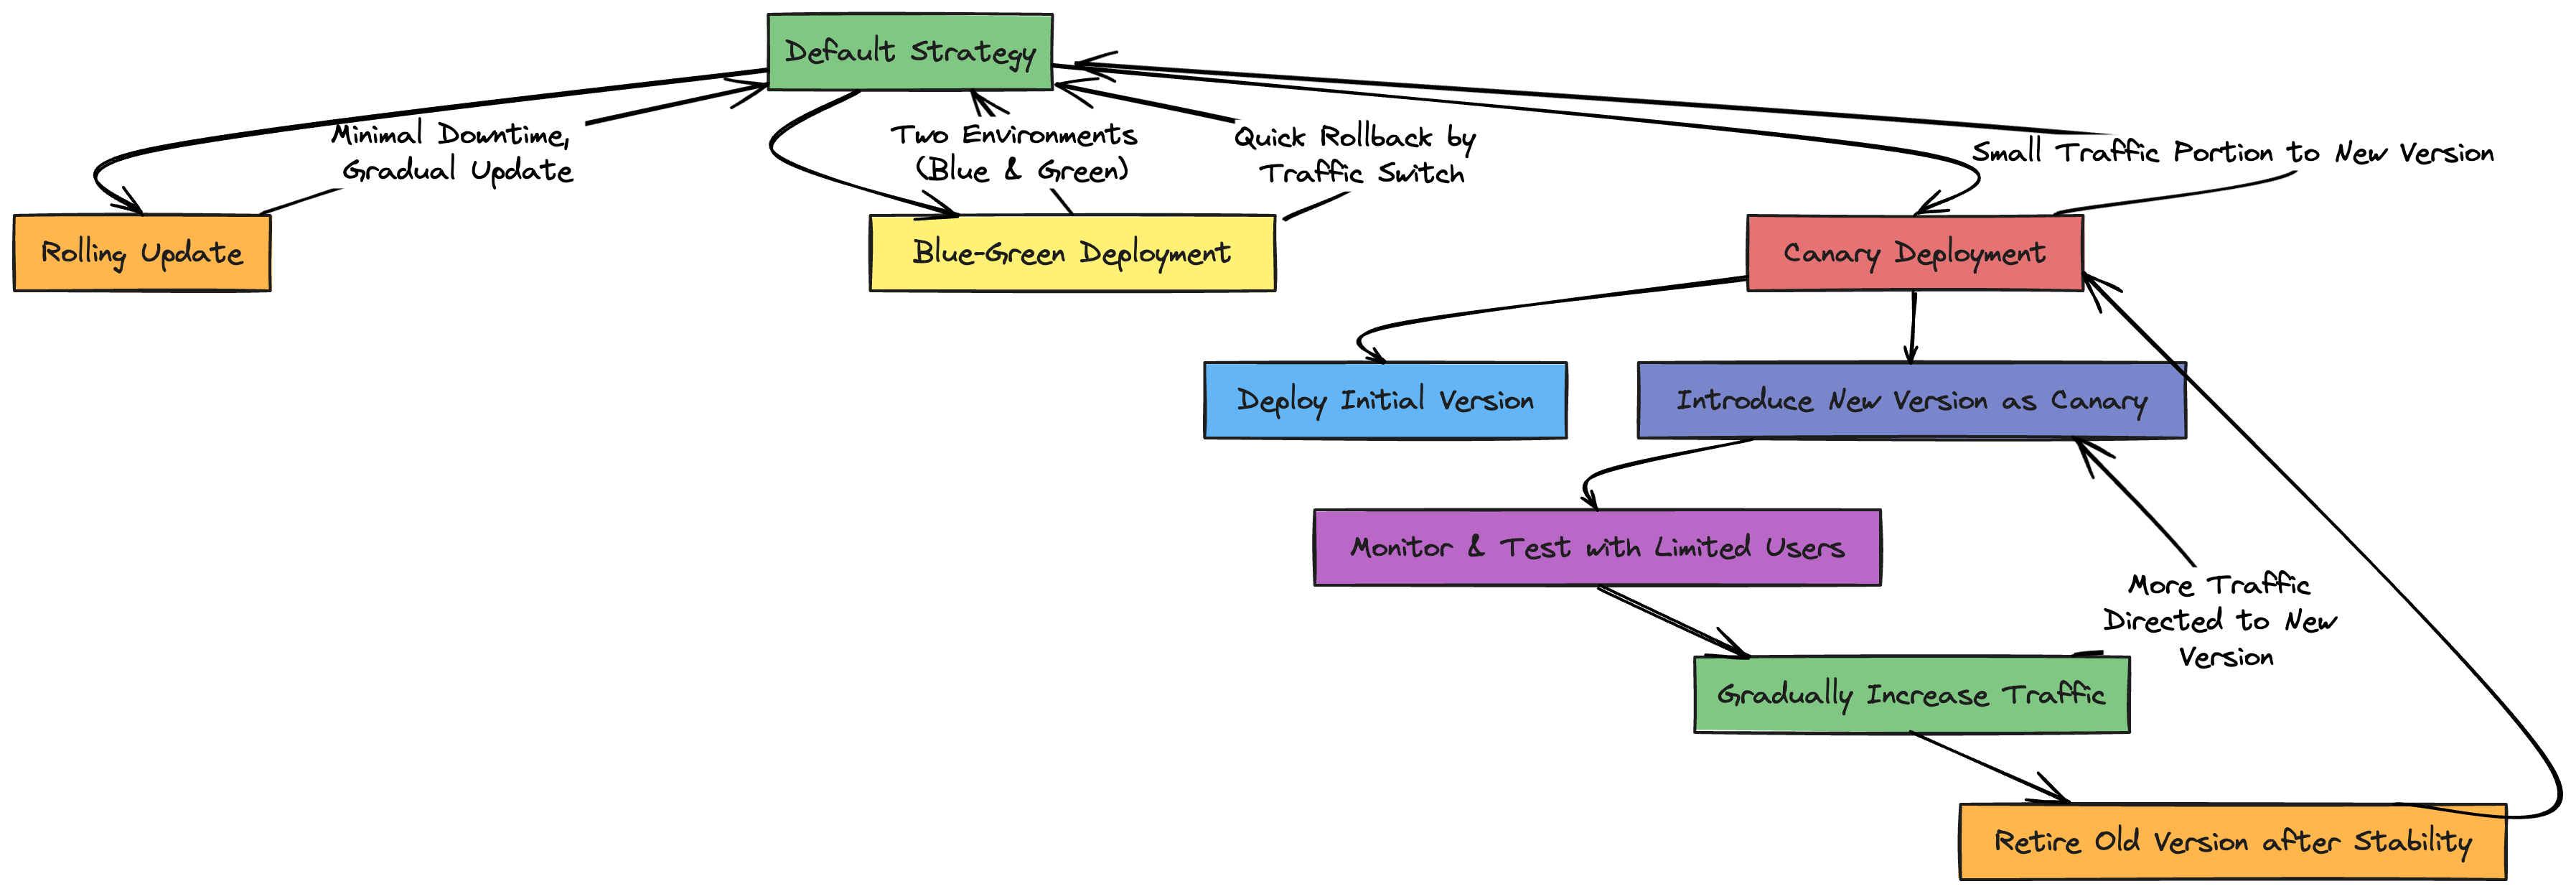
Kubernetes uses Rolling Update by default, replacing old pods with new ones in small increments. Think of it as changing tires on a car that’s still moving—at any given time, there’s a mix of old and new pods.
- What it does: Gradually replaces old pods with new pods.
- Benefits: The service stays up with minimal downtime.
- Limitations: You don’t get fine-grained control over which version of the app is served and when.
But what if you want to test a new version on just a small slice of traffic first? Enter Canary Deployment. 🐤
🎨 Quick Nod to Blue-Green Deployment
Blue-Green Deployment is like bringing a whole new version online alongside the current one (like a backup band for the star 🎸). Then, when you’re ready, you switch all traffic to the new version (Green 💚). If anything goes wrong, you flip back to Blue 💙. It’s a great rollback strategy, but it doubles resource requirements since you need both versions running simultaneously.
📝 The Update Strategies in a Nutshell
Here’s a handy flowchart that summarizes the various update strategies, including Rolling Update, Blue-Green, and Canary Deployment:
🐤 Implementing a Canary Deployment in Kubernetes
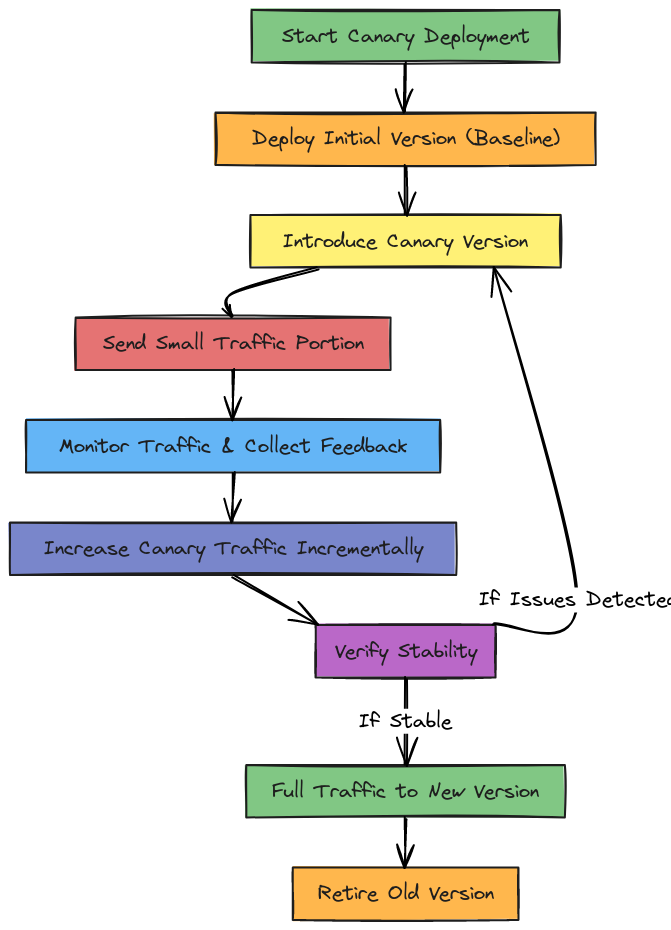
A Canary Deployment lets you roll out updates gradually by sending a small slice of traffic to a “canary” version. You monitor its performance and, if all goes well, gradually scale it up until it replaces the old version. Here’s how to set it up!
🔧 Step-by-Step Setup of a Canary Deployment
Let’s start by creating version 1 of our app and then introduce version 2 in a limited capacity. Here’s what the YAML and commands look like:
Version 1 Deployment (my-app-v1)
apiVersion: apps/v1
kind: Deployment
metadata:
  name: my-app-v1
  labels:
    app: my-app
spec:
  replicas: 3
  selector:
    matchLabels:
      app: my-app
      version: v1
  template:
    metadata:
      labels:
        app: my-app
        version: v1
    spec:
      containers:
      - name: nginx
        image: nginx
        ports:
        - containerPort: 80
        volumeMounts:
        - name: workdir
          mountPath: /usr/share/nginx/html
      initContainers:
      - name: install
        image: busybox:1.28
        command:
        - /bin/sh
        - -c
        - "echo version-1 > /work-dir/index.html"
        volumeMounts:
        - name: workdir
          mountPath: "/work-dir"
      volumes:
      - name: workdir
        emptyDir: {}
Explanation:
- initContainers: This is a special container that runs before the main container starts. Here, we use
busyboxto create anindex.htmlfile that writesversion-1to it. This file will be served by Nginx. - volumeMounts: Both the main and init containers mount an
emptyDirvolume. This volume is a temporary storage that lives only for the lifecycle of the pod and lets us share files between the init container and the main Nginx container.
🏷️ Service for the App (my-app-svc)
The Service connects both versions (v1 and v2) based on the shared label app: my-app. This acts as a middleman, distributing traffic to the matched pods.
apiVersion: v1
kind: Service
metadata:
  name: my-app-svc
  labels:
    app: my-app
spec:
  type: ClusterIP
  ports:
  - name: http
    port: 80
    targetPort: 80
  selector:
    app: my-app
🔍 Testing Version 1
With everything set up, let’s test version 1 to make sure it’s live. Here’s the command:
kubectl run -it --rm --restart=Never busybox --image=gcr.io/google-containers/busybox --command -- wget -qO- my-app-svc
Explanation:
- kubectl run: Creates a temporary pod (we’ll use
--rmto delete it after). - –restart=Never: Prevents Kubernetes from restarting the pod if it fails, so it’s a one-time run.
- wget -qO- my-app-svc: The
wgetcommand fetches the web page atmy-app-svcand outputs (-O-) its content. This is a quick way to see if version 1 is serving the correct content, which should sayversion-1.
🌱 Deploying the Canary Version (Version 2)
Now we create a deployment for version 2 with only one replica. This keeps it small, directing only a small fraction of traffic to this canary.
apiVersion: apps/v1
kind: Deployment
metadata:
  name: my-app-v2
  labels:
    app: my-app
spec:
  replicas: 1
  selector:
    matchLabels:
      app: my-app
      version: v2
  template:
    metadata:
      labels:
        app: my-app
        version: v2
    spec:
      containers:
      - name: nginx
        image: nginx
        ports:
        - containerPort: 80
        volumeMounts:
        - name: workdir
          mountPath: /usr/share/nginx/html
      initContainers:
      - name: install
        image: busybox:1.28
        command:
        - /bin/sh
        - -c
        - "echo version-2 > /work-dir/index.html"
        volumeMounts:
        - name: workdir
          mountPath: "/work-dir"
      volumes:
      - name: workdir
        emptyDir: {}
👀 Testing the Service with Canary
With both versions running, we can observe traffic splitting by repeatedly querying the service. This is the fun part where we see if both versions are reachable:
kubectl run -it --rm --restart=Never busybox --image=gcr.io/google-containers/busybox -- /bin/sh -c 'while sleep 1; do wget -qO- my-app-svc; done'
Explanation:
- /bin/sh -c: Runs a simple shell loop to query the service every second.
- wget -qO- my-app-svc: Outputs the response from
my-app-svc, showing eitherversion-1orversion-2. You should start seeing mixed results if the canary is live.
Output:
version-1
version-1
version-1
version-2
version-2
version-1
Kubernetes’ service load balancer is now sending a small amount of traffic to version 2 (the canary), with the bulk still hitting version 1.
📈 Scaling Up the Canary
If all looks good, we scale up version 2 to handle more traffic:
kubectl scale --replicas=4 deploy my-app-v2
Now, version 2 will start handling more requests. When we’re fully confident, we can retire version 1:
kubectl delete deploy my-app-v1
And just like that, our canary deployment has evolved into the primary version with zero downtime.
🗺️ Detailed Flow for Canary Deployment
To provide a clearer picture of the steps involved in Canary Deployment, here’s a more detailed flowchart focusing specifically on this strategy:
🌟 Final Thoughts
There you have it! From Kubernetes’ default Rolling Update to Blue-Green and Canary Deployments, you’ve seen multiple ways to handle updates with minimal impact. Remember, each strategy has its place. Canary is perfect for gradual rollouts, while Blue-Green is great when you need a fast rollback option. Happy deploying! 🎉

